Overview:
When you purchase a Powerline bundle, the 2 Powerline adapters come pre-configured with matching security encryption keys, so they will automatically sync up when plugged into your home network. But once you have an existing Powerline network, how do you add more Powerline adapters to the network? You can use the steps below to add additional Powerline adapters to your network.
Process:
- Make sure your current Powerline adapters are plugged in and working in your current Powerline Network.

(Figure 1)
(*example only, your Powerline may be different)
- On any of the Powerline adapters in your current Powerline network, press the Powerline AV Ethernet Adapter Security button for 2 seconds. (See example in figure #1 above.)
- The Power LED starts blinking after you release the button.
- The adapter automatically creates a new, randomly generated network encryption key that each Powerline adapter on the network will use.
Note: Do not press the security button on both Powerline adapters while adding a new Powerline device. Make sure that the Powerline adapter is not on power saving mode, the security button is not working on this mode.
At this point, the other adapters in your network cannot communicate with each other.
- Within 2 minutes of pressing the Security button on the existing Powerline adapter, you want to press the Security button on the second adapter (the one you want to add) for 2 seconds.
- In order to pair the devices, you need to press both buttons within 2 minutes.
- This securely configures your Powerline network with the same network encryption key.
- If you want to add additional Powerline adapters, press the Security button on the next adapter for 2 seconds, and then press the Security button on any additional adapters in your network for 2 seconds. The adapters retain security settings even if they are unplugged.
Note: Make sure that you connect the new Powerline adapters directly to power outlets and not on power surge protectors or power strips.
There are really 6 different types of PLC products that have been or are sold by NETGEAR today :
- Homeplug 1.0 (including the XE102G, XE102, WGXB102, WGX102);
- HomePlug 1.0 Turbo (including the XE103G, XE103, XEB1004, XE104, XETB1001, XET1001, XEPS103, XEPSB103, XEPSB1001);
- HomePlug AV (including XAVB101, XAV101, XAVB1004, XAV1004, XAV1101, XAV2101, XAV2501, XAV1601).
- HomePlug AV 500 Mbps (including XAV5001, XAV5501, XAV5004)
- HomePlug AV 1000 Mbps (including PL1000, PLP1000, PLP1000T, PLW1000, PLPW1000, PLPW1000T)
- HomePlug AV 1200 Mbps (including PL1200, PLP1200)
- HomePlug AV 2000 Mbps (including PLP2000)
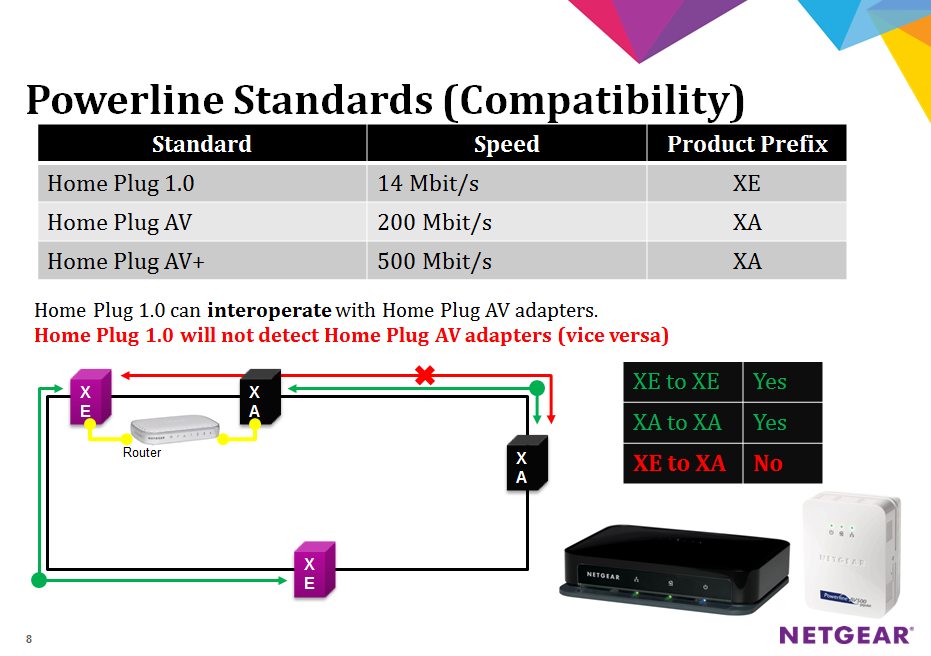
In terms of compatibility, please consider the following --
HomePlug 1.0 (14Mbps) coexists and is interoperable with HomePlug 1.0 Turbo (85Mbps), but at the lower speed. So, if you have an existing HomePlug 1.0 network and attach a HomePlug 1.0 Turbo device, it will connect at 14Mbps.
HomePlug 1.0 (14Mbps) and HomePlug 1.0 Turbo (85Mbps) can coexist with HomePlug AV (200Mbps & 500 mbps) devices, but are not interoperable. So these devices can exist in the same home and operate independently, but cannot communicate together.
HomePlug AV 200 Mbps, 500 Mbps, 1000 Mbps, 1200Mbps and 2000 Mbps coexist and are interoperable with each other; however, we do not recommend using different generations of devices together as this might lead to performances issues.
Troubleshooting
If you are having problems with synchronizing one or more Powerline adapters, you have the option of resetting them to Factory default by pressing the Factory Reset button for 1 second, then release. Resetting the Powerline Adapter to Factory default will reset the security encryption key back to its default, then you can try steps 1-3 (above) again. You can also reset the adapter by logging into the genie interface of the powerline adapter.
** Please refer to your Powerline User Manual for additional information on adding additional Powerline devices to the Powerline network. You can also visit this link for information: Product FAQ: Powerline adapters
Last Updated:04/10/2023
|
Article ID: 22165